Published
- 6 min read
Tessera Lab 0 - Setup and Installation

Tessera – [noun] a small tablet (as of wood, bone, or ivory) used by the ancient Romans as a ticket, tally, voucher, or means of identification
Objective
Project Tessera is an educational initiative designed to equip participants with full-stack development skills. This program involves building “Tessera”, a web application that simulates a live event ticketing platform. Participants will engage with Python and Flask for backend API development, React and Vite for the frontend, and SQLite for database management, encompassing setup, development, and deployment of a functional prototype. The project emphasizes practical software development skills and system integration.
Project Setup
In today’s lab, we will be installing some software and tools to be able to begin working on our project. We will be creating a GitHub repository to store our code in a central location so we can track our progress throughout the labs.
GitHub
Navigate to github.com and create a new repository (you should see a green “New” button somewhere on your home screen.
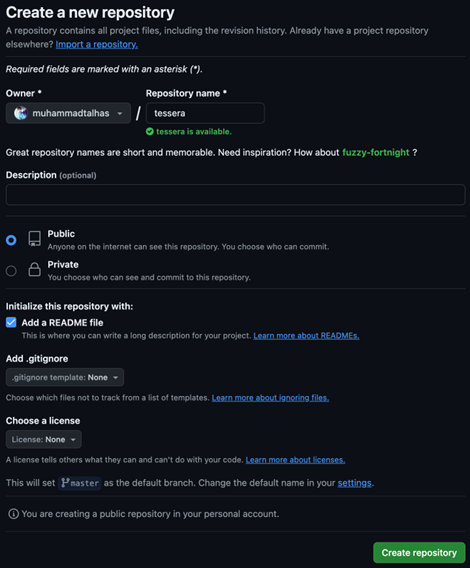
Fill out the inputs as seen below. Feel free to name your project whatever you want! Make sure to include a README as we’ll use this to describe your project to visitors of your profile. Its up to you whether you want this to be a public repository or a private one (show off your skills!)

Congrats! You took the first (and hardest) step – Starting!
Installing Git
Lets install git on our local machines (not to be confused with GitHub!). Git is a version control system (VCS) that allows multiple developers to track and manage changes to code. GitHub, on the other hand, is a hosting platform that uses Git and provides additional tools and features to facilitate collaboration among developers on various projects. GitHub enhances Git’s capabilities with a user-friendly web interface and added functionalities like issue tracking, feature requests, and more.
Open your terminal and type the following command
brew install gitYou can verify that everything installed correctly by running this command (The version number printed doesn’t really matter - lets just make sure SOMETHING is installed!)
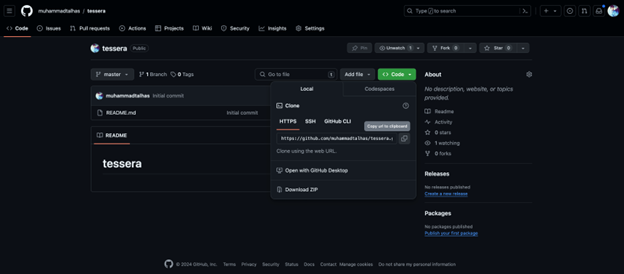
git --versionNice! Now we’re going to “clone” our the github repository we just created. The term clone means copying the repository from GitHub to your local machine so you can work on it offline. To do so we need the repository URL, Below is a screenshot of where to get it from the webpage. Remember to click HTTPS in the popup – for the purposes of this lab, it helps speed up the process! Click on the green Code button - click HTTPS - copy the URL.

Let’s navigate back to the terminal. Navigate your terminal to a folder you’d like to work in (Ask me if you need help on this!). I suggest the “Documents” folder for easy access later on. Once you’re at the root of the folder, run the following command.
git clone <URL>Note: Any time you see
< >, it is to denote that you need to replace the entire string with your input. So for the above, I would rungit clone https://github.com/muhammadtalhas/tessera
IDE
An IDE, or Integrated Development Environment, is a software tool that consolidates basic programming tools into one graphical user interface. It includes a code editor, debugger, and other features that help developers write, test, and debug their code more efficiently.
Throughout these labs, we’ll be using an IDE to write, test, and debug out code. You are welcome to use any IDE you are comfortable with but I suggest you use VSCode. IDE’s (like many things in software engineering) is a personal choice but there are always a few IDEs that you’ll run into where ever you go. Just like everything else, the popularity of these change with time. As of now, VSCode seems to be the most popular.
Open the tessera folder we cloned in your IDE
Tools and Libraries
We can’t build a house without tools – neither can we build software. Let’s install some things! Below you’ll find some commands to run. You don’t need to understand them just yet, by the end of this project you’ll be a pro. For now, run the commands, pay attention to the outputs, and try to guess what’s going on.
Let’s move back to the terminal window you have open. Navigate to the folder we cloned from GitHub (Ask for help if you need it!).
Run the following commands (one by one)
       mkdir frontend backend database
brew install python
pip install Flask
brew install sqlite
sqlite3 --version
brew install node
cd frontend
npm create vite@latest . -- --template react
npm install
You have all the tools you’ll need to bring tessera to life! We’ll still learn to use many more tools throughout our labs, but for now, lets get to work!
Experimenting
Let’s experiment with the power that’s at our fingertips. Navigate back to the root of the teserra project (if you do an `ls` command you should see README.md, backend, frontend, database). Run the following command. This command will populate a database running locally on your machine with some data (we’ll understand all these words soon I promise!)
curl -sSL https://gist.githubusercontent.com/muhammadtalhas/126df2ff007e27ce567e277dd3f8a911/raw/9a795e0e7ad01697a30003c7e40bc0c280985685/db_setup.sh | bashLet’s now navigate over to our IDE. Create a new file inside the backend folder. Let’s call it “app.py”. Open it up, and paste the following code:
       from flask import Flask, jsonify, make_response
import sqlite3

app = Flask(__name__)

def get_db_connection():
    conn = sqlite3.connect('../database/tessera.db')
    conn.row_factory = sqlite3.Row
    return conn

@app.route('/names')
def names():
    conn = get_db_connection()
    cur = conn.cursor()
    cur.execute('SELECT * FROM demo')
    names = cur.fetchall()
    conn.close()
    names_list = [name['names'] for name in names]

    # Create a response object and set CORS headers
    response = make_response(jsonify(names_list))
    response.headers['Access-Control-Allow-Origin'] = '*'  # Allow all domains
    response.headers['Access-Control-Allow-Methods'] = 'GET, POST'  # Specify methods to allow
    return response


if __name__ == '__main__':
    app.run(debug=True)
Now open the frontend folder and under the src folder, replace the the code inside of App.jsx with this code:
       import React, { useState, useEffect } from 'react';

function App() {
  const [names, setNames] = useState([]);

  // Fetch names from the API on component mount
  useEffect(() => {
    fetch('http://localhost:5000/names')
      .then(response => response.json())
      .then(data => setNames(data))
      .catch(error => console.error('Error fetching names:', error));
  }, []);

  return (
    <div style={{ margin: '20px', fontFamily: 'Arial', backgroundColor: '#f0f0f0', color: '#333' }}>
      <h1>The Kings and Queens of Tessera</h1>
      <ul>
        {names.map((name, index) => (
          <li key={index} style={{ padding: '10px', backgroundColor: '#fff', marginBottom: '5px', color: '#333' }}>
            {name}
          </li>
        ))}
      </ul>
    </div>
  );
}

export default App;
Lets see some magic – Open 2 terminal windows. You can also open terminals inside VSCode (Ask for help if you need it). In one window, navigate to the backend folder. Run the following command
python3 app.pyIn the second terminal, run the following command
npm run devNow, open your favorite web browser and navigate to http://localhost:5173
It may not seem like much - but this is the start to Tessera!