Published
- 11 min read
Tessera Lab 2 - Building a starter API

Objective
Develop the backend logic for the Tessera system. We will be focusing on delivering an API that focuses on basic functionality that our Tessera webapp will need. Our language of choice is Python for this project using the Flask library. We’ll be creating API endpoints which will be able to list events and event information. We’ll also be creating APIs for managing users, which we will use for our user creation, user login, and user management flows. Finally, we’ll create an API which will be able to award users tickets to events. Even after all this, we wont be done building APIs for Tessera, but we have to start somewhere! Any thoughts on what else we might need? Think through what functionality you expect from a website selling tickets to events and make a list! Lets get started 🚀
Tools, Tools, and more Tools!
Hope you still have Hard Drive space, because we’re NOT done downloading tools. For this Lab, lets add Postman to our tool box. Postman (among other things) is a tool for testing and interacting with APIs. As we build our API, well use Postman to test our APIs to make sure its working as expected! Once you download Postman, fire it up and follow any prompts it asks for. Postman may ask you to create some optional accounts and such. We dont need it - get the bare minimum up and running (Ask me for help if you run into anything youre confused about).
Blast Off
Lets get started - brush off your SQL knowledge from the last lab and lets delete any data within your SQL database. Once we’ve reset - let’s create some new test data. For now, lets just create a few events. Try to mix it up with the data - different locations, different times and dates. Open up the app.py file in your backend folder and lets replace the code with this to start out with. Theres comments included with the code but ask me questions if you need more direction!
\
       from flask import Flask, jsonify, make_response, request # Importing the Flask library and some helper functions
import sqlite3 # Library for talking to our database
from datetime import datetime # We'll be working with dates

app = Flask(name) # Creating a new Flask app. This will help us create API endpoints hiding the complexity of writing network code!

# This function returns a connection to the database which can be used to send SQL commands to the database
def get_db_connection():
  conn = sqlite3.connect('../database/tessera.db')
  conn.row_factory = sqlite3.Row
  return conn

# When asked, add code in this area

if __name__ == '__main__':
    app.run(debug=True)
API Creation - Listing Events
First thing we always do before building is define a general requirement for ourselves. In this case - We want and API endpoint which we request a list of events. But lets add some functionality to this. Let’s also add the ability to filter events by dates that are in the future (maybe we only want to show events on our website that are in the future) and allow filtering by location.
Lets start with the basics first - return ALL events. Add the following function to your code:
       @app.route('/events', methods=['GET'])
def get_events():
    conn = get_db_connection()  # Establish database connection
    cursor = conn.cursor()

    # SQL query to select all events
    cursor.execute('SELECT * FROM Events')
    events = cursor.fetchall()  # Fetch all events

    # Convert rows into a list of dicts to make them serializable
    events_list = [dict(event) for event in events]

    conn.close()  # Close the database connection

    return jsonify(events_list)  # Return the list of events as JSON
Lets run our code. Reminder: Open your terminal (you can do this in your IDE) and navigate to the backend folder and run python3 app.py.
Now to test if it works! Fingers crossed!!
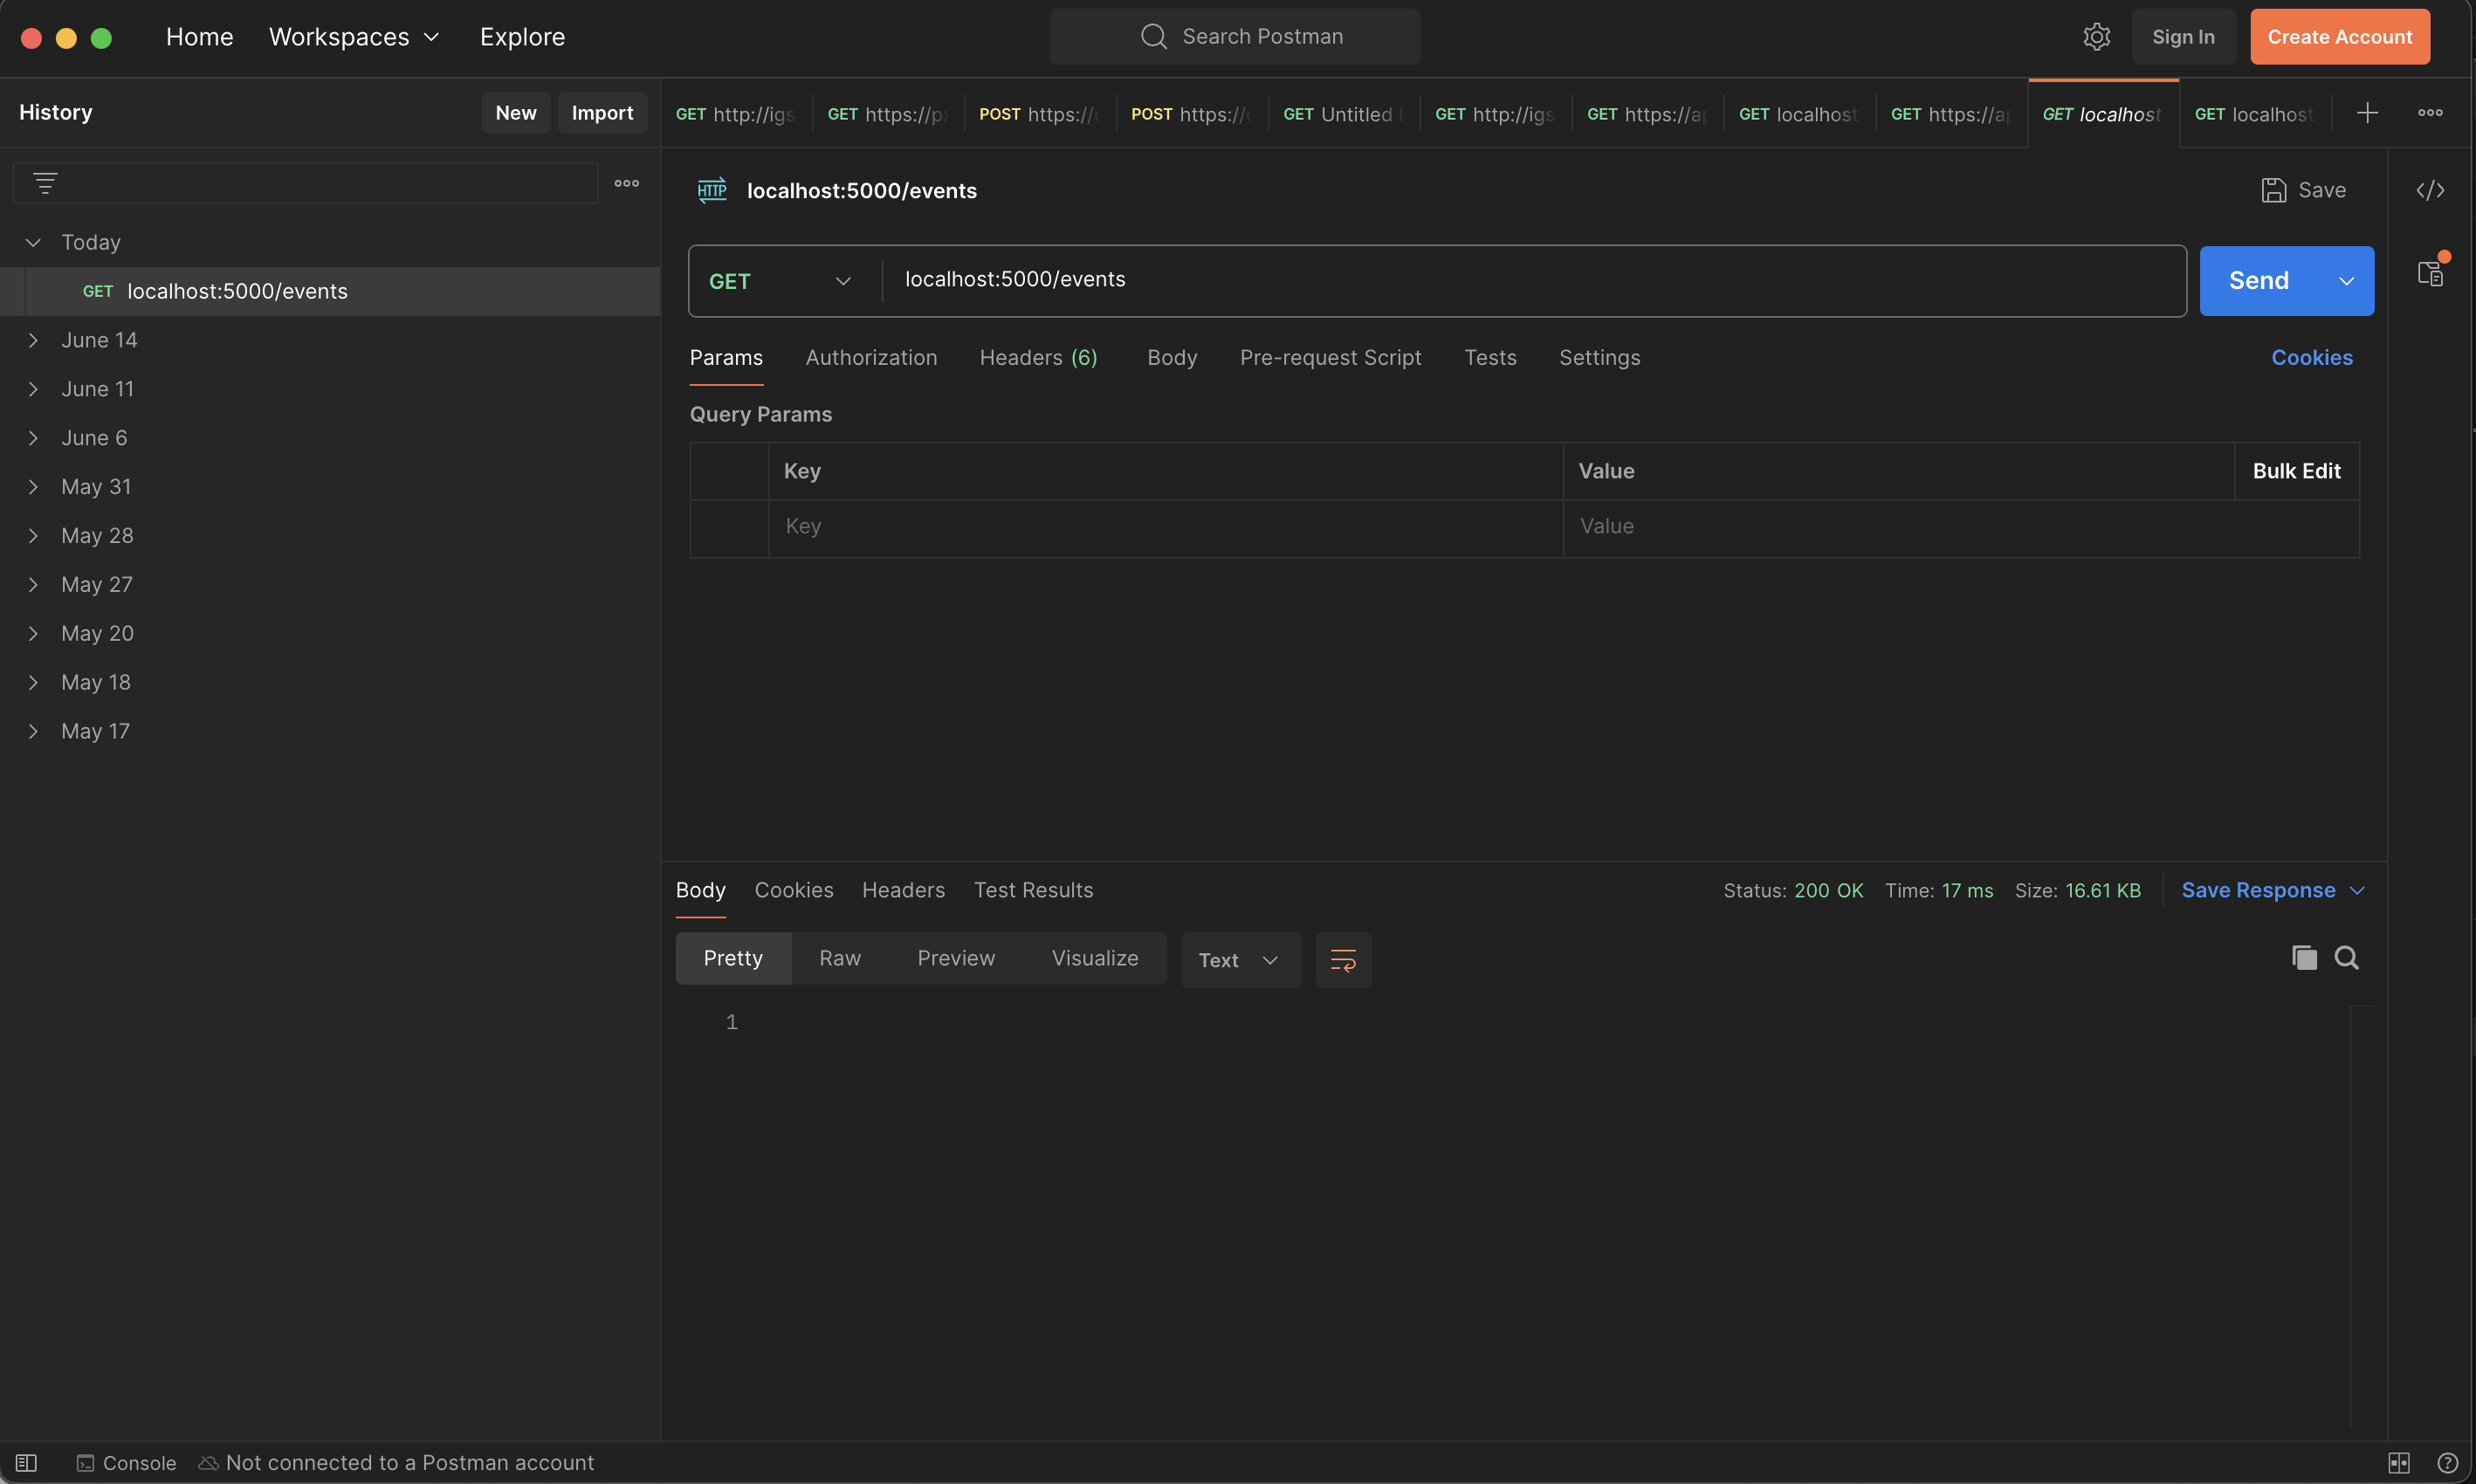
Open up postman and lets create a new request (should be a little + button near the top). In the URL section, type localhost:5000/events. This URL represents where to send your request. The localhost:5000 sections represents your local computer on port 5000. Dont worry about this too much right now. You can read more about network ports on this handy article. Make sure GET is selected in the dropdown to select your HTTP method. Check below for what it should look like:

Hit that shiny blue send button!
If the stars allign, you should see some magical json in the bottom section. Scroll through it and you should see the data in your databse!! Change up some of the data in the databse. Hit send again. Do you see changes?
Checkpoint question: What is the HTTP Status code that was returned? What does it mean?
Lets add some functionality to only get future events:
       @app.route('/events', methods=['GET'])
def get_events():
    conn = get_db_connection()
    cursor = conn.cursor()

    # Start with the base SQL query
    query = 'SELECT * FROM Events'
    params = []

    # Check if the 'afterDate' parameter is provided in the query string
    after_date = request.args.get('afterDate')
    if after_date:
        query += ' WHERE date > ?'
        params.append(after_date)

    # Execute the query with or without the date filter
    cursor.execute(query, params)
    events = cursor.fetchall()

    # Convert the rows to dictionaries to make them serializable
    events_list = [dict(event) for event in events]

    conn.close()

    return jsonify(events_list)
Explanation of changes:
- Query Parameter Handling: The
afterDateparameter is fetched from the request’s query string usingrequest.args.get('afterDate'). - Conditional SQL Query Modification: If
afterDateis provided, the SQL query is modified to include aWHEREclause that filters out events occurring on or before the specified date. - Parameterized Query Execution: The date value from
afterDateis safely included in the SQL query execution to protect against SQL injection by using parameterized queries (params.append(after_date)).
Wait wait wait… whats a query parameter… that wasnt in the lecture????
Query parameters are a way to pass information to a server as part of a URL. They are appended to the URL after a question mark (?), with individual parameters separated by ampersands (&). Each parameter consists of a key and a value, linked by an equals sign (=). Query parameters are used to filter content, pass data, and dynamically adjust what is returned by a request based on the values provided. For example, in the URL http://example.com/api/items?category=books&sort=ascending, the parameters category and sort tell the server to return items categorized as books and to sort them in ascending order. This flexibility makes query parameters an essential tool for APIs.
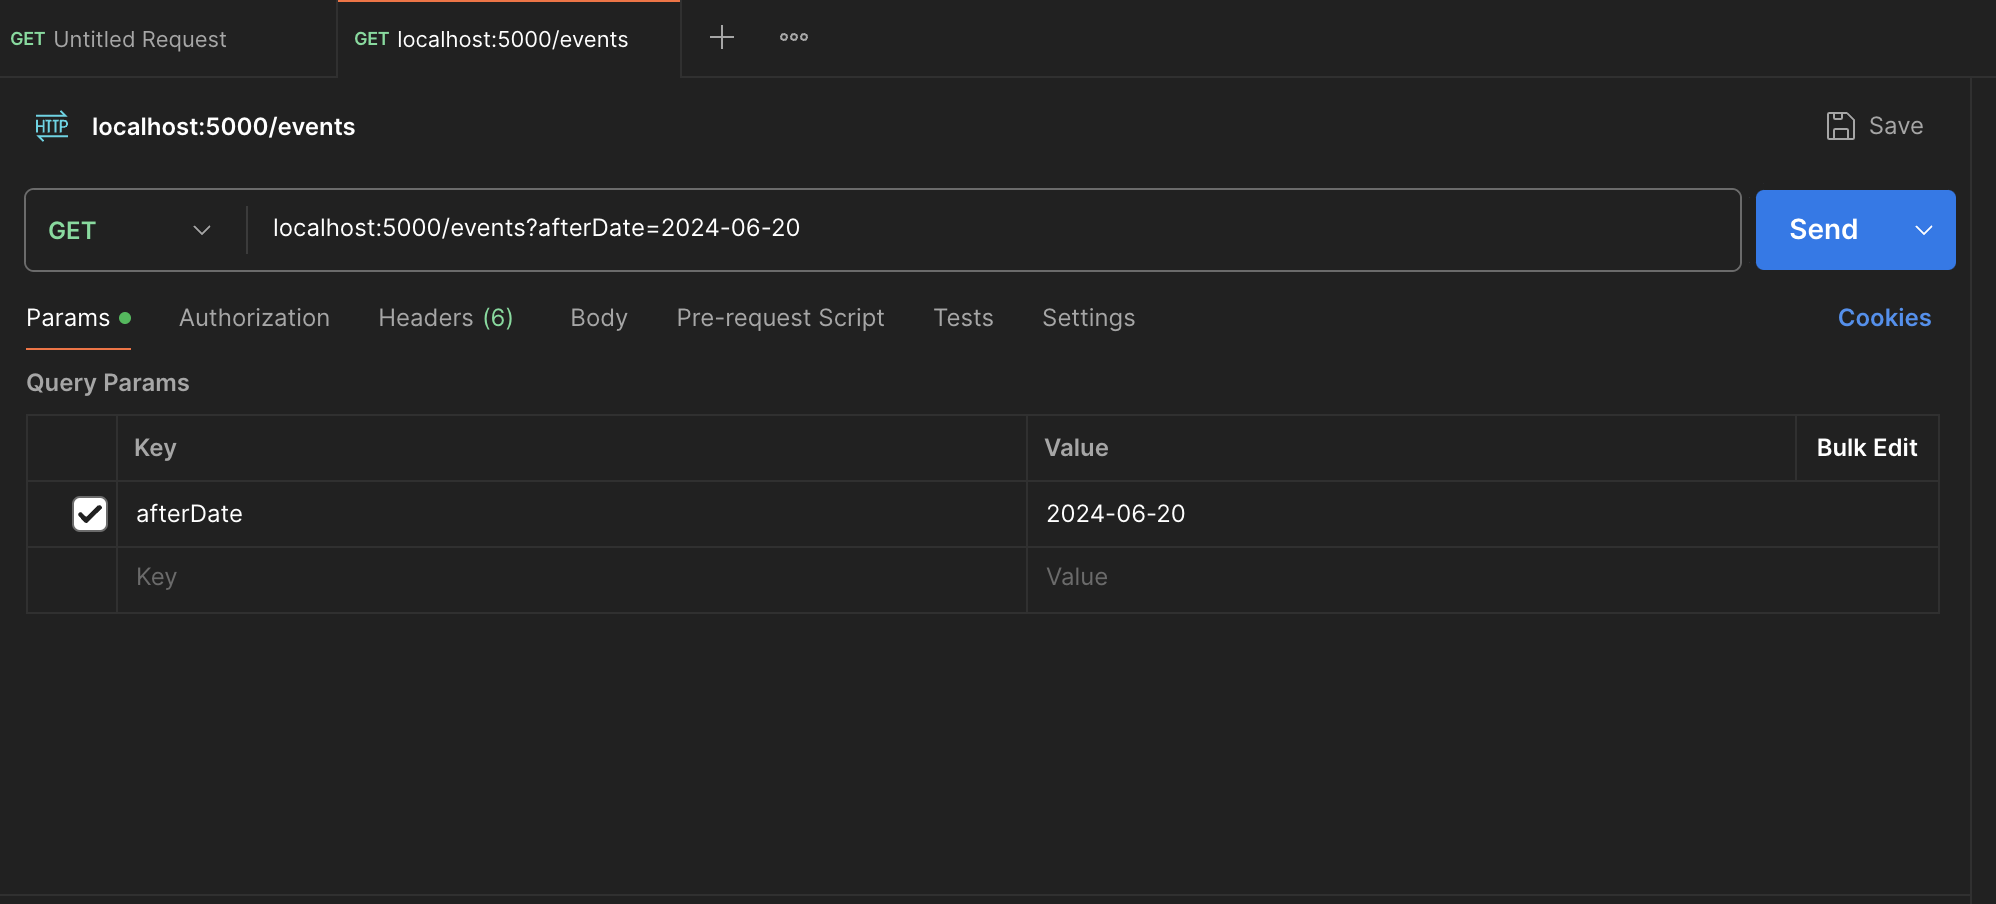
Let’s test it again! Lets go back to postman and add a query parameter. On the top portion of the screen, click the first tab labeled Params. Add the afterDate param like the screenshot below (set the value to something that makes sense with the data you have in your database)

Hit send and check to make sure your filtering is working.
Insane. You’ve built and API to communicate with a database. Thats an extraordinary feat! Before we continue, try adding the location filter! Remember - you’ll need to support multiple filters at once too (afterDate and location). This can be trickey I’ve provided code below but try it yourself first!
Click here for a solution
       @app.route('/events', methods=['GET'])
def get_events():
  conn = get_db_connection()
  cursor = conn.cursor()

  # Start with the base SQL query
  query = 'SELECT * FROM Events'
  params = []
  query_conditions = []

  # Check for the 'afterDate' filter
  after_date = request.args.get('afterDate')
  if after_date:
      query_conditions.append('date > ?')
      params.append(after_date)

  # Check for the 'location' filter
  location = request.args.get('location')
  if location:
      query_conditions.append('location = ?')
      params.append(location)

  # Add WHERE clause if conditions are present
  if query_conditions:
      query += ' WHERE ' + ' AND '.join(query_conditions)

  # Execute the query with the specified conditions
  cursor.execute(query, params)
  events = cursor.fetchall()

  # Convert the rows to dictionaries to make them serializable
  events_list = [dict(event) for event in events]

  conn.close()

  return jsonify(events_list)
API Creation - Creating a New User
Lets now create a user creation endpoint. Lets remember that during our schema creation, we talked about not storing passwords and instead we will store password hashes. Password hashing turns your password (or any other piece of data) into a short string of letters and/or numbers using an encryption algorithm. The same string will ALWAYS out the same string of letters and numbers so during login, we can just re-hash the input password and compare what we have stored. We’ll talk about this more in later labs.
For hashing, we need to install a library. run the following command in your terminal
pip3 install WerkzeugBack at the top of your python code, include the library as an import
from werkzeug.security import generate_password_hashSweet, lets create a user creation endpoint:
       @app.route('/user', methods=['POST'])
def create_user():
    # Extract email, username, and password from the JSON payload
    email = request.json.get('email')
    username = request.json.get('username')
    password = request.json.get('password')

    # Basic validation to ensure all fields are provided
    if not email or not username or not password:
        return jsonify({'error': 'All fields (email, username, and password) are required.'}), 400

    # Hash the password
    hashed_password = generate_password_hash(password)

    try:
        conn = get_db_connection()
        cursor = conn.cursor()

        # Attempt to insert the new user into the Users table
        cursor.execute('INSERT INTO Users (email, username, password_hash) VALUES (?, ?, ?)',
                       (email, username, hashed_password))
        conn.commit()  # Commit the changes to the database

        # Retrieve the user_id of the newly created user to confirm creation
        cursor.execute('SELECT user_id FROM Users WHERE username = ?', (username,))
        new_user_id = cursor.fetchone()

        conn.close()

        return jsonify({'message': 'User created successfully', 'user_id': new_user_id['user_id']}), 201

    except sqlite3.IntegrityError:
        return jsonify({'error': 'Username or email already exists.'}), 409
    except Exception as e:
        return jsonify({'error': str(e)}), 500
Oh boy, alot of code. Lets outline whats going on
- We’re expecting the username, the password, and the email of the new users
- We want to make sure all these required fields are provided, If they aren’t w want to throw an error (whats the HTTP code were returning here? What does it mean?
- We hash the password because we know security well
- We try to insert the user into our database and commit our changes (commit is like telling the database to save any unsaved changes)
- We return the new
user_idto the requester.
Notice we have some error handling going on. What errors are we expecting? What do we do when it happens?
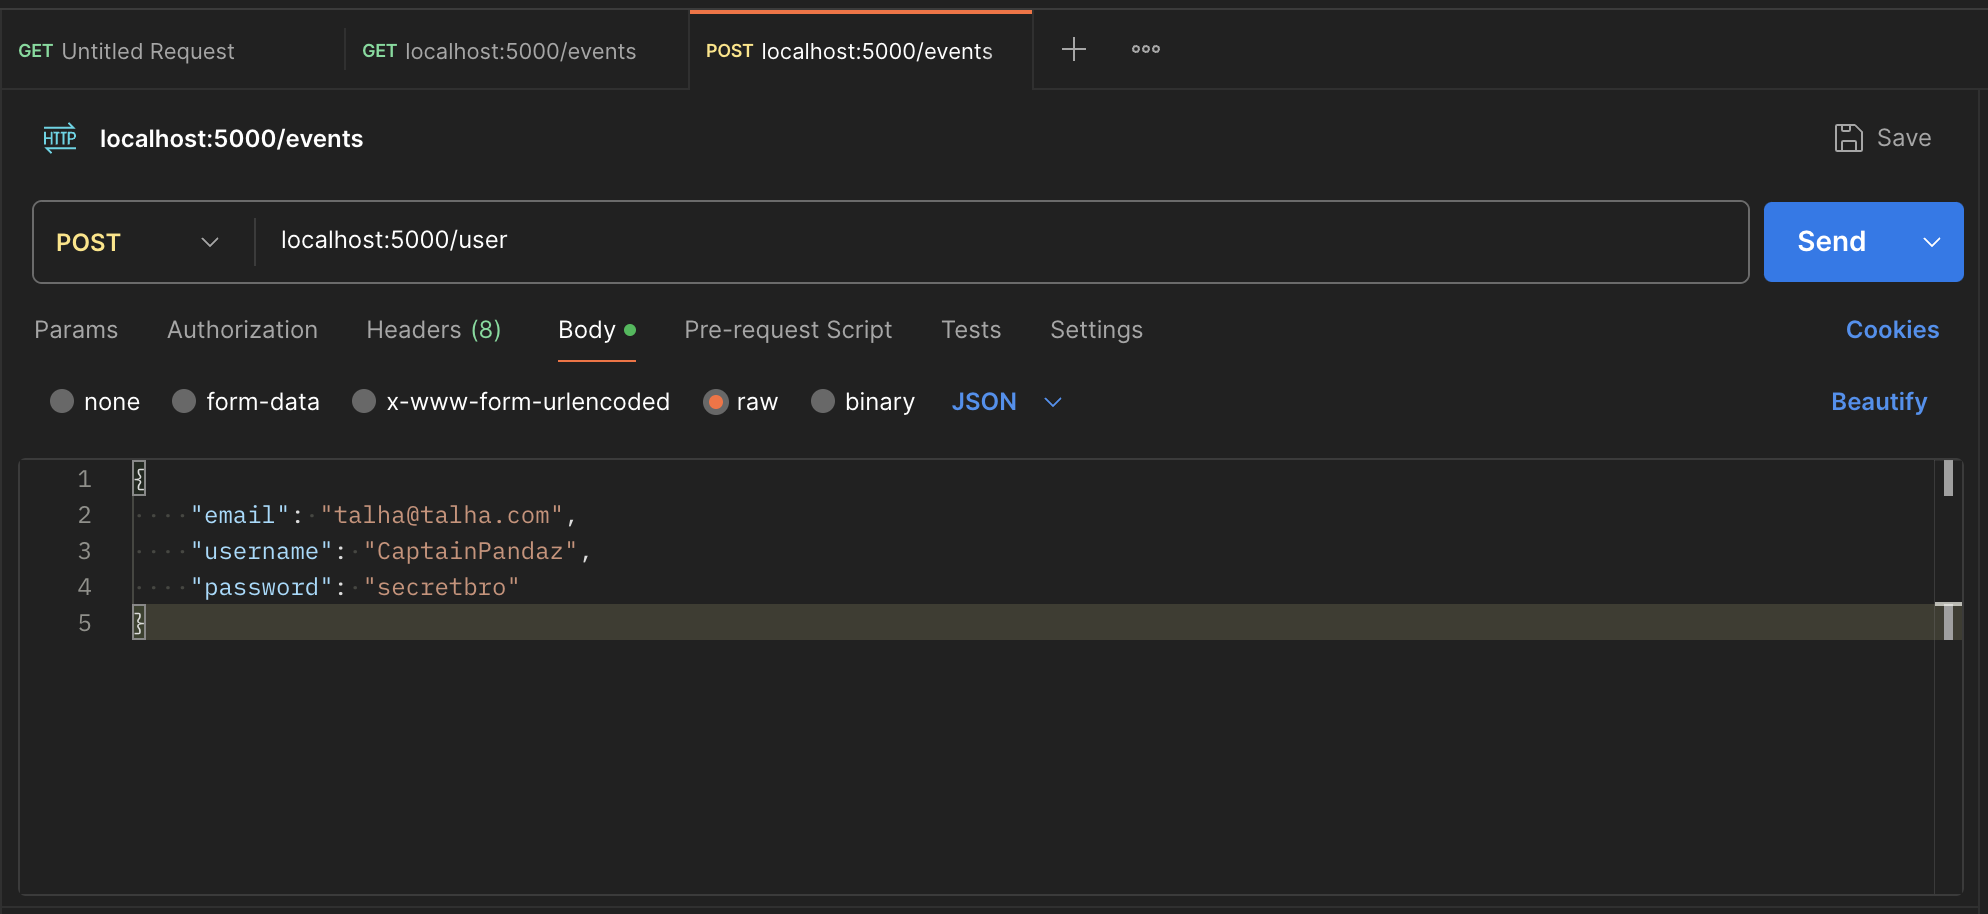
Lets test it! Lets go to Postman! Check the screenshot below for help. Note the method is POST for this endpoint. Also note that we are proving a BODY this time. You can edit your request body by selecting the Body tab on the top section of the screen. Remember - our API speaks JSON!

Challange - A login API
I have a Challenge for you. I will provide minimal hints here - but ask me for guidance! I want you to create a API with the URL /login which will accept username and password in the JSON body. The API should check to see if the login is correct and return a proper JSON message with the HTTP Code 200. Otherwise, It should return a proper JSON message with an error and the HTTP Code 401.
Since we store hashes, we will need to compare hashes of passwords. The Werkzeug library provides a function to help with this. Read about it here. You’ll need ot import it like so in your code
from werkzeug.security import generate_password_hash, check_password_hashGood Luck!
Api Creation - Everything else…?
At this point, you should have everything you need to go out into the world of APIs and leave your mark. You’re now apart of the elite 😎. The rest of this lab, I want you to create APIs that YOU think we’ll need. Any API you think will be useful to you as we continue with Tessera. The skys the limit. Here’s a few ideas:
- A PUT endpoint that allows users to change their username or emails
- A PUT endpoint that allows users to change their password (remember that you usually want to check their current passwords too!)
- A DELETE endpoint allowing a user to delete themselves
- A POST endpoint allowing event creation - maybe you want to build an admin section on your website for admins to create new events
- A GET endpoint to return all emails in a database so we can sell data to partners
- A POST endpoint that requires a user_id and an event_id and awards the user a ticket. What about multiple tickets in one call?
The skys the limit! Have more ideas? Talk to me about it! We’ll work through it together.
Pat yourself on the back, we’re literally making magic!